

Table of Contents
I remember my first time making royal icing with meringue powder for Valentine’s cookies. It was a big change for me. The icing was easy to use and tasted great, making it perfect for decorating cookies.
As I learned more, I found out many people like royal icing with meringue powder. It’s safe to eat and doesn’t have raw eggs, unlike some other recipes. This makes it a great choice for Valentine’s cookies and decorating.
Exploring royal icing with meringue powder, I realized it’s perfect for Valentine’s cookies. It comes in two main types: thick for piping and thin for flooding. This makes it great for all sorts of decorating, whether you’re new or experienced.
Key Takeaways
- Royal icing made with meringue powder is safe to eat and does not use raw eggs
- Royal icing with meringue powder is ideal for valentines cookies and cookie decorating
- The two main consistencies for royal icing are thick piping consistency and thin flood consistency
- Royal icing can be frozen for a duration of 2-3 months, providing options for future use or reducing waste from excess icing
- Royal icing with meringue powder is perfect for creating beautiful and delicious valentines cookies
- Royal icing with meringue powder is a great choice for cookie decorating due to its ease of use and delicious taste
- Royal icing with meringue powder can be stored in an airtight container for up to 2 weeks in the fridge
Understanding Royal Icing With Meringue Powder
Royal icing is a special icing used for decorating cookies. It’s made from meringue powder, water, and powdered sugar. Meringue powder makes the icing stable and consistent, perfect for cookie decorating.
Using royal icing with meringue powder has many benefits. It’s safe from salmonella and other foodborne illnesses. Plus, meringue powder lasts longer than fresh eggs, making it easier for bakers.
What Makes Royal Icing Special
Royal icing is great for detailed designs that buttercream and glaze can’t do. Its consistency can be stiff or flood-like. This makes it easier to decorate cookies with precision.

Why Choose Meringue Powder Over Fresh Eggs
Meringue powder is a mix of sugar, egg whites, and other ingredients. It gives royal icing a stable texture. It’s also safer than using raw eggs, avoiding salmonella and other illnesses.
Benefits for Cookie Decorating
Meringue powder in royal icing means better control and precision for decorating. It also lasts longer than fresh eggs, which is handy for bakers. The benefits of using it for cookie decorating include:
- Easy to use and mix
- Consistent texture and flavor
- Longer shelf life than fresh eggs
- Eliminates the risk of salmonella and other foodborne illnesses
Essential Tools and Ingredients for Perfect Royal Icing
To make perfect royal icing, you need a few key tools and ingredients. The royal icing ingredients include confectioners’ sugar, meringue powder, and water. These are vital for the right consistency and texture. You’ll also need cookie decorating tools like a mixer and a piping bag.
Here are some of the essential tools and ingredients you will need:
- Confectioners’ sugar
- Meringue powder
- Water
- Mixer
- Piping bag
Using top-quality royal icing ingredients and the right cookie decorating tools is crucial. It ensures your royal icing turns out perfect. With these, you can make beautiful and tasty cookies.
My Foolproof Royal Icing Recipe
Having a royal icing recipe that works every time is key for cookie decorating. I’ve found a simple recipe that makes smooth icing. It’s made with confectioners’ sugar, meringue powder, and water.
To make this icing, you need 4 cups of powdered sugar, 2 ½ tablespoons of meringue powder, and 6 tablespoons of water. You can add a teaspoon of vanilla extract for extra flavor. The trick is to mix the ingredients just right and for the right amount of time.
Ingredient Measurements and Ratios
The right mix of confectioners’ sugar and meringue powder is important. I use 4 cups of sugar to 2 ½ tablespoons of meringue powder. This mix makes the icing stable and easy to work with. You can adjust the icing’s thickness by adding more water or sugar.
Mixing Instructions
To mix the icing, put the powdered sugar, meringue powder, and water in a big bowl. Mix until it’s smooth and consistent. This should take about 5 minutes with an electric mixer. You can also add a few drops of food coloring to tint the icing.
Storage Tips
After making the royal icing, store it in an airtight container at room temperature for up to 3 days. You can also freeze it for up to 2 months. To use the icing again, thaw it at room temperature or add a bit of water to rehydrate it.
Achieving the Perfect Consistency
To get the perfect royal icing, knowing about royal icing consistency is key. The right consistency is vital for making beautiful cookie designs. Experts say getting the perfect consistency is essential for decorating cookies.
Here are some tips to help you achieve the perfect consistency:
- Adjust the ratio of ingredients: The ratio of water to powdered sugar determines the icing consistency, with adjustments made based on thickness.
- Mix the icing to the right texture: The mixing time for royal icing is approximately 4 minutes on medium-high speed to achieve the desired fluffy texture and stiff peaks.
- Test the icing consistency: Testing the icing consistency involves checking how quickly it cascades from the spatula; flooding consistency should almost disappear instantly.
By following these tips and understanding the importance of royal icing consistency, you can achieve the perfect consistency for your royal icing. This will help you create beautiful cookie designs.
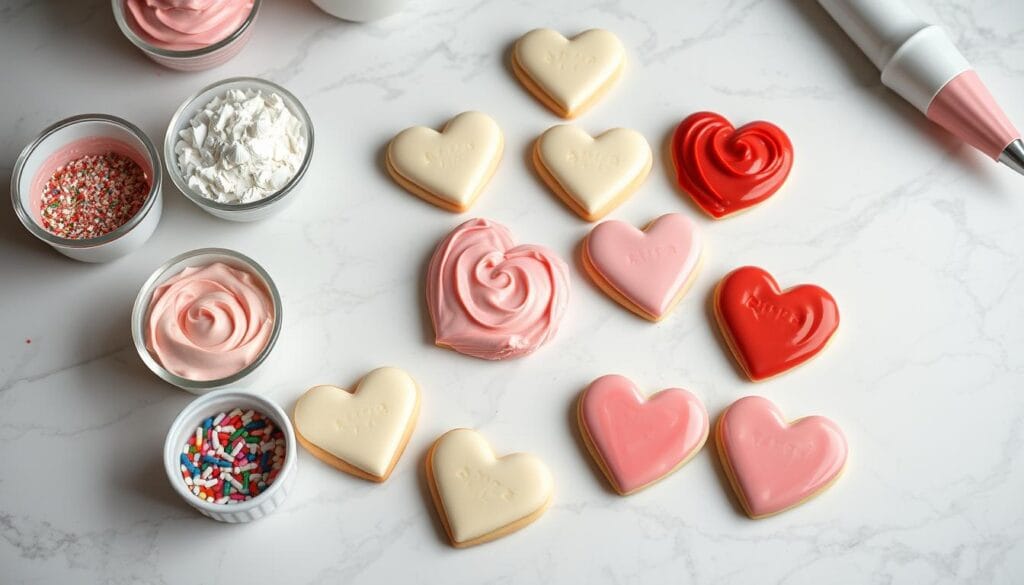
Valentine’s Cookie Decorating Techniques
Valentines cookie decorating has many techniques to learn. Flooding is a favorite, where you fill a cookie with thin royal icing. It’s key to use the right icing and work fast, as it dries quickly. This method is great for making detailed designs, like heart shapes, perfect for Valentine’s Day.
Creating heart shapes is another technique. You can use a cookie cutter or draw the shape with a piping bag. Start by piping a border, then fill it with icing. Adding details like lines or patterns can make the heart more interesting.
- Use a turntable to display your cookies and make it easier to access all sides.
- Experiment with different flooding methods, such as using a squeeze bottle or a piping bag.
- Practice creating heart shapes and other designs to get a feel for the icing and the piping bag.
Mastering these techniques will help you make stunning cookies for Valentine’s Day. Whether you’re flooding or making heart shapes, the most important thing is to have fun and be creative. With practice, you’ll soon be decorating cookies like a pro.
| Technique | Description |
|---|---|
| Flooding | Filling a large area of the cookie with a thin layer of royal icing. |
| Creating Heart Shapes | Using a cookie cutter or piping bag to create heart shapes on the cookie. |
Color Mixing Guide for Valentine’s Designs
Creating beautiful Valentine’s designs needs a color mixing guide. To get the right shades of pink and red, knowing color mixing basics is key. For a classic look, pink icing is essential. A simple guide helps you mix colors for your designs.
To make perfect pink, start with a bit of red gel color. Then, add it slowly to your icing. This way, you get a deep, rich pink. For a bright red, mix red with a bit of yellow gel color. Always mix colors a little at a time. It’s easier to add more than it is to take it away.
- Start with a deep pink base to create red icing, reducing the amount of red gel color needed
- Use a combination of red and yellow gel color to create a vibrant, fire engine red
- Experiment with different ratios of color to icing to achieve unique, custom shades
Follow these tips and use a color mixing guide for stunning Valentine’s designs. Whether for cookies, cakes, or treats, the right colors matter. With practice and patience, you’ll master color mixing and impress everyone with your designs.
| Color | Ratio of Color to Icing | Tip |
|---|---|---|
| Pink | 1-2 drops of red gel color per 1 cup of icing | Start with a small amount of color and add more as needed |
| Red | 2-3 drops of red gel color per 1 cup of icing | Use a combination of red and yellow gel color for a vibrant red |
Troubleshooting Common Royal Icing Issues
Working with royal icing can sometimes lead to problems like it being too thick or too thin. Troubleshooting these issues is key to getting the right consistency. To fix it, add a little water or powdered sugar. Be careful and gentle when mixing to avoid a crumbly texture.
Some common royal icing issues include color bleed, air bubbles, and craters. To avoid color bleed, use good food coloring and don’t overdo it. Air bubbles can be lessened by mixing at a medium speed and letting the icing rest before bagging. Craters can be stopped by using a quick setting method, like warm air, right after decorating.
Here are some tips for troubleshooting common royal icing issues:
- Too thick icing: add a small amount of water
- Too thin icing: add a small amount of powdered sugar
- Color bleed: use high-quality food coloring and avoid oversaturation
- Air bubbles: maintain a medium speed when mixing and allow the icing to sit before bagging
- Craters: use a quick setting technique, such as warm airflow, immediately after decorating
By following these tips and being aware of common royal icing issues, your cookies will look great. Always use the best ingredients and be patient with royal icing. With practice, you’ll master troubleshooting and make stunning cookies.
| Issue | Solution |
|---|---|
| Too thick icing | Add a small amount of water |
| Too thin icing | Add a small amount of powdered sugar |
| Color bleed | Use high-quality food coloring and avoid oversaturation |
| Air bubbles | Maintain a medium speed when mixing and allow the icing to sit before bagging |
| Craters | Use a quick setting technique, such as warm airflow, immediately after decorating |
Advanced Decorating Techniques
Exploring royal icing has opened up new ways to decorate cookies. I love making 3d effects with it. This means piping icing to form three-dimensional designs on the cookie.
Layering methods are also key. I apply different layers of icing, letting each dry before adding the next. This makes the design look textured and adds depth.
Other techniques I’ve tried include:
- Using a turntable for symmetrical designs
- Creating texture techniques with icing
- Adding fine details with a small paintbrush
Mastering these techniques has helped me make stunning, unique cookies. They’re perfect for any special event.
Drying and Setting Tips
When drying and setting royal icing, several factors matter. The right drying conditions are key for a great finish. I’ve found that royal icing cookies need at least 6-8 hours to dry at room temperature.
A thin crust forms on the icing in 30 minutes to an hour. Thicker icing dries faster than thinner. For flood icing, aim for a 5-15 second drying time. Dry air speeds up drying, while humid air slows it down.
Here are some tips for drying your icing well:
- Use a fan to help dry the icing, but not too strong to mess up designs.
- Try using food dehydrators to dry icing layers faster than air.
- In humid places, air conditioning or dehydrators can really help.
Drying times vary based on icing type, climate, and drying tools. By using these tips, you can get your royal icing to look perfect.
| Consistency | Drying Time |
|---|---|
| Stiff consistency | 4-6 hours |
| Piping consistency | 6-8 hours |
| Flood consistency | 8-10 hours |
Storing and Packaging Decorated Cookies
Keeping decorated cookies fresh and intact is key. Proper storage is essential to keep them in top shape. Here are some tips for storing and packaging your cookies:
To keep cookies fresh, store them in an airtight container at room temperature. This stops moisture from making them stale. For longer storage, the fridge or freezer works well. Just remember to label containers with the date and contents, to avoid allergy concerns.
Here are some extra tips for storing and packaging decorated cookies:
- Use airtight containers or re-usable yogurt containers to prevent crusting
- Press cling film against the surface of the icing to prevent exposure to air
- Label containers with the date and contents
- Store in a cool, dry place to prevent humidity from affecting the icing
Royal icing decorations can last forever if stored right. But, buttercream can cause royal icing to discolor over time. Keep cookies in a cool, dry place and away from sunlight to prevent this.
By following these tips, your decorated cookies will stay fresh and look amazing. Always use proper storing and packaging techniques to keep your cookies in great condition.
| Storage Method | Shelf Life |
|---|---|
| Airtight container at room temperature | 2-3 days |
| Airtight container in the fridge | up to 2 weeks |
| Airtight container in the freezer | almost indefinite |
Creative Valentine’s Design Ideas
Valentine’s Day is a time to show love and affection through creative designs. You can make beautiful, unique cookies for the holiday. Heart patterns are a classic choice, perfect for Valentine’s Day.
Modern romance designs also show love and affection. They include intricate details like flowers and leaves. These designs make your cookies delicious and beautiful to look at.
Inspiration for Message Cookies
Message cookies add a personal touch to Valentine’s Day. You can write “I love you” or “Be mine” on them. This makes your cookies both beautiful and heartfelt.
Some popular ideas include:
- Using heart patterns to create a border or design on the cookie
- Incorporating romance designs, such as flowers or leaves, into the cookie design
- Adding a special message or phrase to the cookie to make it more personal
These tips help you create unique Valentine’s Day designs. Whether you prefer classic heart patterns or modern romance designs, there are many ways to show your love.
| Design Idea | Description |
|---|---|
| Heart Pattern | A classic design featuring a heart pattern |
| Romance Design | A modern design featuring romantic motifs, such as flowers or leaves |
| Message Cookie | A cookie designed with a special message or phrase |
Conclusion
As we wrap up our cookie decorating journey, let’s talk about the key to amazing Valentine’s Day treats. Royal icing with meringue powder is essential. It gives your cookies a smooth, creamy texture. Plus, it’s stable and consistent, perfect for stunning cookies.
This icing is a favorite among serious bakers and decorators. It’s great for heart patterns, modern designs, or cookies with personal messages. It ensures your cookies look flawless every time. And, it’s safe because it doesn’t use raw egg whites.
So, keep improving your cookie decorating skills and get creative. Remember, royal icing with meringue powder is the secret to amazing Valentine’s Day desserts. Happy baking, and may your cookies be as sweet as love!
FAQ
What makes royal icing with meringue powder special?
Royal icing with meringue powder is great for decorating cookies. It’s stable and consistent. This makes it a favorite among cookie decorators for its ease and taste.
What are the benefits of using meringue powder over fresh eggs?
Meringue powder gives royal icing a consistent texture. It’s easier to work with than fresh eggs. Plus, it’s safer to use.
What tools and ingredients are needed to make perfect royal icing?
To make perfect royal icing, you need confectioners’ sugar, meringue powder, water, and a mixer. Quality ingredients and tools are key for the right consistency and texture.
How do I achieve the perfect consistency for royal icing?
Getting the right consistency for royal icing is key for decorating. You can adjust the ingredients and mixing to get the texture you need. This is important for flooding, piping, or detailed designs.
What are some common royal icing issues and how do I fix them?
Royal icing can be too thick or too thin. To fix it, add more water or confectioners’ sugar. We’ll also cover other common problems and how to solve them.
How do I create Valentine’s-themed designs with royal icing?
We’ll show you how to make Valentine’s cookies with royal icing. From classic hearts to modern designs, we’ll guide you through color mixing and step-by-step decorating.
How do I properly store and package decorated cookies?
Storing and packaging decorated cookies right is crucial. We’ll share tips on how to keep them fresh and prevent damage. This includes transporting and storing them.
Did You Try Our Recipe ?
There are no reviews yet. Be the first one to write one.